在myeclipse上整合ssm框架
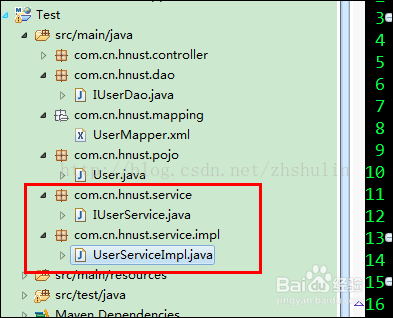
1、所有需要的JAR包都引入以后,首先进行Spring与MyBatis的整合,然后再进行JUnit测试,先看一个项目结构图:

2、建立spring-mybatis.xml配置文件
这个文件就是用来完成spring和mybatis的整合的。这里面也没多少行配置,主要的就是自动扫描,自动注入,配置数据库。注释也很详细,大家看看就明白了。
spring-mybatis.xml
<?xml version="1.0" encoding="UTF-8"?>
<beans xmlns="http://www.springframework.org/schema/beans"
xmlns:xsi="http://www.w3.org/2001/XMLSchema-instance" xmlns:p="http://www.springframework.org/schema/p"
xmlns:context="http://www.springframework.org/schema/context"
xmlns:mvc="http://www.springframework.org/schema/mvc"
xsi:schemaLocation="http://www.springframework.org/schema/beans
http://www.springframework.org/schema/beans/spring-beans-3.1.xsd
http://www.springframework.org/schema/context
http://www.springframework.org/schema/context/spring-context-3.1.xsd
http://www.springframework.org/schema/mvc
http://www.springframework.org/schema/mvc/spring-mvc-4.0.xsd">
<!-- 自动扫描 -->
<context:component-scan base-package="com.cn.hnust" />
<!-- 引入配置文件 -->
<bean id="propertyConfigurer"
class="org.springframework.beans.factory.config.PropertyPlaceholderConfigurer">
<property name="location" value="classpath:jdbc.properties" />
</bean>
<bean id="dataSource" class="org.apache.commons.dbcp.BasicDataSource"
destroy-method="close">
<property name="driverClassName" value="${driver}" />
<property name="url" value="${url}" />
<property name="username" value="${username}" />
<property name="password" value="${password}" />
<!-- 初始化连接大小 -->
<property name="initialSize" value="${initialSize}"></property>
<!-- 连接池最大数量 -->
<property name="maxActive" value="${maxActive}"></property>
<!-- 连接池最大空闲 -->
<property name="maxIdle" value="${maxIdle}"></property>
<!-- 连接池最小空闲 -->
<property name="minIdle" value="${minIdle}"></property>
<!-- 获取连接最大等待时间 -->
<property name="maxWait" value="${maxWait}"></property>
</bean>
<!-- spring和MyBatis完美整合,不需要mybatis的配置映射文件 -->
<bean id="sqlSessionFactory" class="org.mybatis.spring.SqlSessionFactoryBean">
<property name="dataSource" ref="dataSource" />
<!-- 自动扫描mapping.xml文件 -->
<property name="mapperLocations" value="classpath:com/cn/hnust/mapping/*.xml"></property>
</bean>
<!-- DAO接口所在包名,Spring会自动查找其下的类 -->
<bean class="org.mybatis.spring.mapper.MapperScannerConfigurer">
<property name="basePackage" value="com.cn.hnust.dao" />
<property name="sqlSessionFactoryBeanName" value="sqlSessionFactory"></property>
</bean>
<!-- (事务管理)transaction manager, use JtaTransactionManager for global tx -->
<bean id="transactionManager"
class="org.springframework.jdbc.datasource.DataSourceTransactionManager">
<property name="dataSource" ref="dataSource" />
</bean>
</beans>
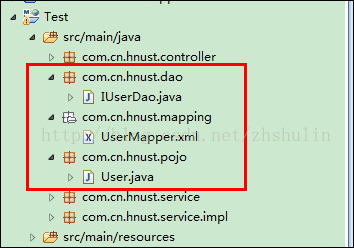
3、利用MyBatis Generator自动创建代码
这个可根据表自动创建实体类、MyBatis映射文件以及DAO接口,当然,我习惯将生成的接口名改为IUserDao,而不是直接用它生成的UserMapper。如果不想麻烦就可以不改。完成后将文件复制到工程中。如图:
4、配置spring-mvc.xml
配置里面的注释也很详细,在此就不说了,主要是自动扫描控制器,视图模式,注解的启动这三个。
<?xml version="1.0" encoding="UTF-8"?>
<beans xmlns="http://www.springframework.org/schema/beans"
xmlns:xsi="http://www.w3.org/2001/XMLSchema-instance" xmlns:p="http://www.springframework.org/schema/p"
xmlns:context="http://www.springframework.org/schema/context"
xmlns:mvc="http://www.springframework.org/schema/mvc"
xsi:schemaLocation="http://www.springframework.org/schema/beans
http://www.springframework.org/schema/beans/spring-beans-3.1.xsd
http://www.springframework.org/schema/context
http://www.springframework.org/schema/context/spring-context-3.1.xsd
http://www.springframework.org/schema/mvc
http://www.springframework.org/schema/mvc/spring-mvc-4.0.xsd">
<!-- 自动扫描该包,使SpringMVC认为包下用了@controller注解的类是控制器 -->
<context:component-scan base-package="com.cn.hnust.controller" />
<!--避免IE执行AJAX时,返回JSON出现下载文件 -->
<bean id="mappingJacksonHttpMessageConverter"
class="org.springframework.http.converter.json.MappingJacksonHttpMessageConverter">
<property name="supportedMediaTypes">
<list>
<value>text/html;charset=UTF-8</value>
</list>
</property>
</bean>
<!-- 启动SpringMVC的注解功能,完成请求和注解POJO的映射 -->
<bean
class="org.springframework.web.servlet.mvc.annotation.AnnotationMethodHandlerAdapter">
<property name="messageConverters">
<list>
<ref bean="mappingJacksonHttpMessageConverter" /> <!-- JSON转换器 -->
</list>
</property>
</bean>
<!-- 定义跳转的文件的前后缀 ,视图模式配置-->
<bean class="org.springframework.web.servlet.view.InternalResourceViewResolver">
<!-- 这里的配置我的理解是自动给后面action的方法return的字符串加上前缀和后缀,变成一个 可用的url地址 -->
<property name="prefix" value="/WEB-INF/jsp/" />
<property name="suffix" value=".jsp" />
</bean>
<!-- 配置文件上传,如果没有使用文件上传可以不用配置,当然如果不配,那么配置文件中也不必引入上传组件包 -->
<bean id="multipartResolver"
class="org.springframework.web.multipart.commons.CommonsMultipartResolver">
<!-- 默认编码 -->
<property name="defaultEncoding" value="utf-8" />
<!-- 文件大小最大值 -->
<property name="maxUploadSize" value="10485760000" />
<!-- 内存中的最大值 -->
<property name="maxInMemorySize" value="40960" />
</bean>
</beans>
5、配置web.xml文件
这里面对spring-mybatis.xml的引入以及配置的spring-mvc的Servlet就是为了完成SSM整合,之前2框架整合不需要在此处进行任何配置。配置一样有详细注释,不多解释了。
<?xml version="1.0" encoding="UTF-8"?>
<web-app xmlns:xsi="http://www.w3.org/2001/XMLSchema-instance"
xmlns="http://java.sun.com/xml/ns/javaee"
xsi:schemaLocation="http://java.sun.com/xml/ns/javaee http://java.sun.com/xml/ns/javaee/web-app_3_0.xsd"
version="3.0">
<display-name>Archetype Created Web Application</display-name>
<!-- Spring和mybatis的配置文件 -->
<context-param>
<param-name>contextConfigLocation</param-name>
<param-value>classpath:spring-mybatis.xml</param-value>
</context-param>
<!-- 编码过滤器 -->
<filter>
<filter-name>encodingFilter</filter-name>
<filter-class>org.springframework.web.filter.CharacterEncodingFilter</filter-class>
<async-supported>true</async-supported>
<init-param>
<param-name>encoding</param-name>
<param-value>UTF-8</param-value>
</init-param>
</filter>
<filter-mapping>
<filter-name>encodingFilter</filter-name>
<url-pattern>/*</url-pattern>
</filter-mapping>
<!-- Spring监听器 -->
<listener>
<listener-class>org.springframework.web.context.ContextLoaderListener</listener-class>
</listener>
<!-- 防止Spring内存溢出监听器 -->
<listener>
<listener-class>org.springframework.web.util.IntrospectorCleanupListener</listener-class>
</listener>
<!-- Spring MVC servlet -->
<servlet>
<servlet-name>SpringMVC</servlet-name>
<servlet-class>org.springframework.web.servlet.DispatcherServlet</servlet-class>
<init-param>
<param-name>contextConfigLocation</param-name>
<param-value>classpath:spring-mvc.xml</param-value>
</init-param>
<load-on-startup>1</load-on-startup>
<async-supported>true</async-supported>
</servlet>
<servlet-mapping>
<servlet-name>SpringMVC</servlet-name>
<!-- 此处可以可以配置成*.do,对应struts的后缀习惯 -->
<url-pattern>/</url-pattern>
</servlet-mapping>
<welcome-file-list>
<welcome-file>/index.jsp</welcome-file>
</welcome-file-list>
</web-app>