Django视图类listview的使用实例
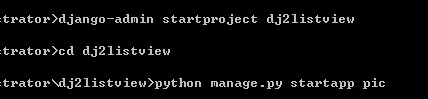
1、在命令行窗口创建Django工程
django-admin startproject dj2listview
cd dj2listview
python manage.py startapp pic
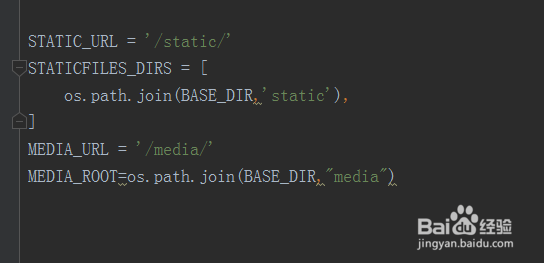
2、在工程同名文件夹的settings.py文件,添加模板路径,静态文件路径,上传文件路径,注册应用,同时注意在templates的options添加
'django.template.context_processors.media'

3、在应用的models.py文件,创建模型类
from django.db import models
# Create your models here.
class picture(models.Model):
title = models.CharField(max_length=50)
picpath = models.ImageField(upload_to='test')

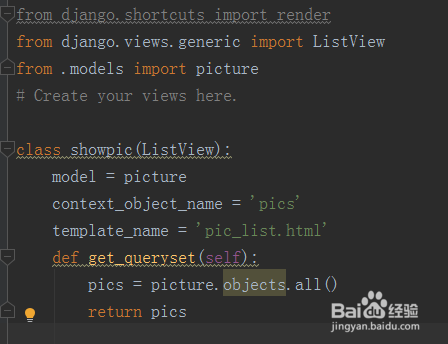
4、在应用的views.py文件,编写类视图,继承自ListView类,代码如下:
from django.shortcuts import render
from django.views.generic import ListView
from .models import picture
# Create your views here.
class showpic(ListView):
model = picture
context_object_name = 'pics'
template_name = 'pic_list.html'
def get_queryset(self):
pics = picture.objects.all()
return pics
这里的get_queryset函数就是用来查询数据库,返回数据的,对应
context_object_name的名字
5、在工程根目录创建templates文件夹,并在文件夹内创建pic_list.html网页文件,代码如下:
<!DOCTYPE html>
<html lang="en">
<head>
<meta charset="UTF-8">
<title>Title</title>
</head>
<body>
{% for pic in pics%}
<div>
<image src = "{{ MEDIA_URL }}{{pic.picpath}}"></image>
<label>{{pic.title}}</label>
</div>
{% endfor %}
</body>
</html>

6、在工程的同名文件夹的urls.py配置到应用的路由和静态MEDIA_URL,代码如下:
from django.contrib import admin
from django.urls import path,include
from django.conf.urls.static import static
from django.conf import settings
urlpatterns = [
path('admin/', admin.site.urls),
path('',include('pic.urls')),
]+static(settings.MEDIA_URL,document_root=settings.MEDIA_ROOT)
注意这里添加添加了staic这样,才能在网页只用使用MEDIA_URL

7、在应用内创建urls.py文件,并编写到showpic类视图的路径,代码如下:
from django.urls import path
from .views import showpic
urlpatterns =[
path(r'',showpic.as_view())
]

8、在工程根目录创建meida文件夹,迁移数据库,并创建一个超级用户,并使用超级用户长传两张图片,打开路径 http://127.0.0.1:8000/ 就可以看到效果了,这个就是个基本列表网站的雏形,要想美观一点就要在前端设计一下
