SpringBoot中如何进行Bean配置
1、Bean配置。
在使用Spring进行开发配置的时候有两类配置:*.xml配置文件、配置的Bean(@Configure),于是在SpringBoot的开发的时间里面,为了继续崇尚所谓的“零配置”,提供有一种简单的支持,也就是说如果现在你真的有配置需要通过*.xml文件编写,但是又不想出现配置文件的话,这个时候最简单的做法就是使用Bean的方式进行类的配置。
前提:该配置程序的Bean所在的包必须是程序启动类所在包的子包之中,这样才可以自动扫描到。
2、下面准备一个不是很正规的程序,建立一个业务接口,而后定义这个接口的子类:
package com.gwolf.service;
public interface IMessageService {
public String info();
}

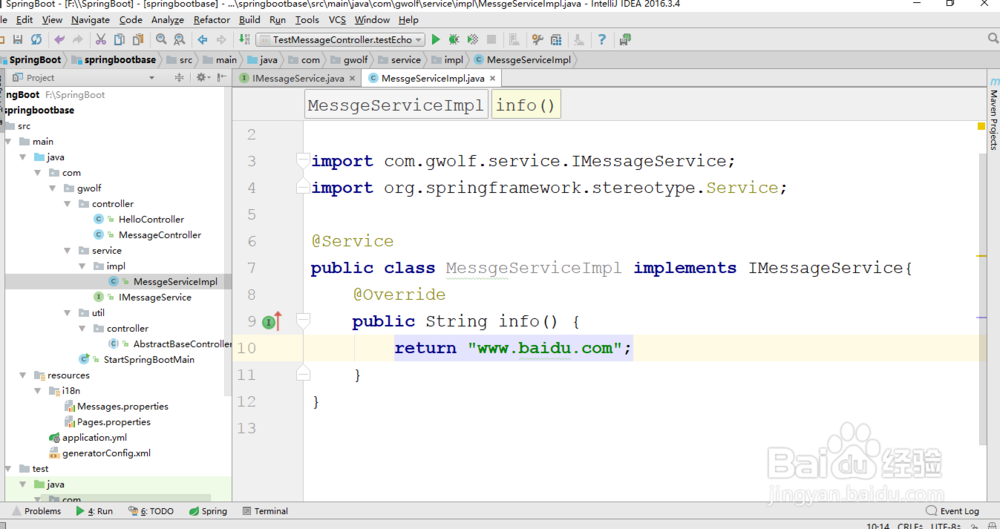
3、创建一个子类实现IMessageService接口:
package com.gwolf.service.impl;
import com.gwolf.service.IMessageService;
import org.springframework.stereotype.Service;
@Service
public class MessgeServiceImpl implements IMessageService{
@Override
public String info() {
return "www.baidu.com";
}
}
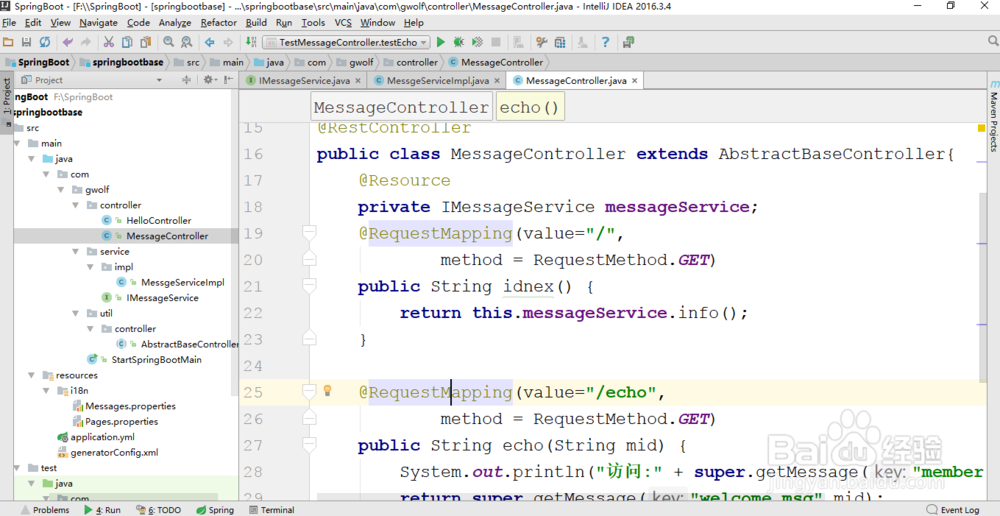
4、在控制器MessageController中注入IMessageService:
package com.gwolf.controller;
import ch.qos.logback.core.net.SyslogOutputStream;
import com.gwolf.service.IMessageService;
import com.gwolf.util.controller.AbstractBaseController;
import org.springframework.web.bind.annotation.PathVariable;
import org.springframework.web.bind.annotation.RequestMapping;
import org.springframework.web.bind.annotation.RequestMethod;
import org.springframework.web.bind.annotation.RestController;
import javax.annotation.Resource;
import javax.servlet.http.HttpServletRequest;
import javax.servlet.http.HttpServletResponse;
@RestController
public class MessageController extends AbstractBaseController{
@Resource
private IMessageService messageService;
@RequestMapping(value="/",
method = RequestMethod.GET)
public String idnex() {
return this.messageService.info();
}
@RequestMapping(value="/echo",
method = RequestMethod.GET)
public String echo(String mid) {
System.out.println("访问:" + super.getMessage("member.add.action"));
return super.getMessage("welcome.msg",mid);
}
}
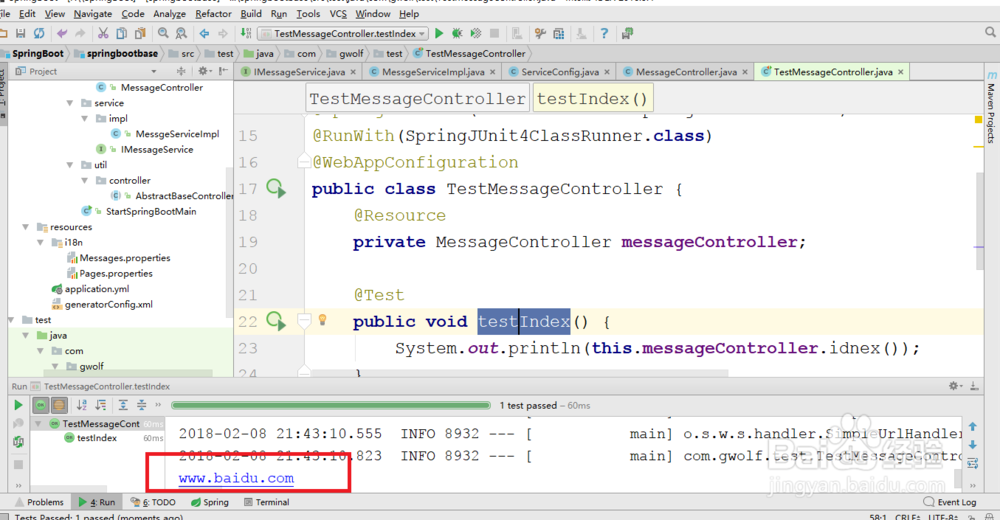
5、建立一个测试类:
package com.gwolf.test;
import com.gwolf.StartSpringBootMain;
import com.gwolf.controller.HelloController;
import com.gwolf.controller.MessageController;
import org.junit.Test;
import org.junit.runner.RunWith;
import org.springframework.boot.test.context.SpringBootTest;
import org.springframework.test.context.junit4.SpringJUnit4ClassRunner;
import org.springframework.test.context.web.WebAppConfiguration;
import javax.annotation.Resource;
@SpringBootTest(classes = StartSpringBootMain.class)
@RunWith(SpringJUnit4ClassRunner.class)
@WebAppConfiguration
public class TestMessageController {
@Resource
private MessageController messageController;
@Test
public void testIndex() {
System.out.println(this.messageController.idnex());
}
@Test
public void testEcho() {
System.out.print(this.messageController.echo("www.baidu.com"));
}
}

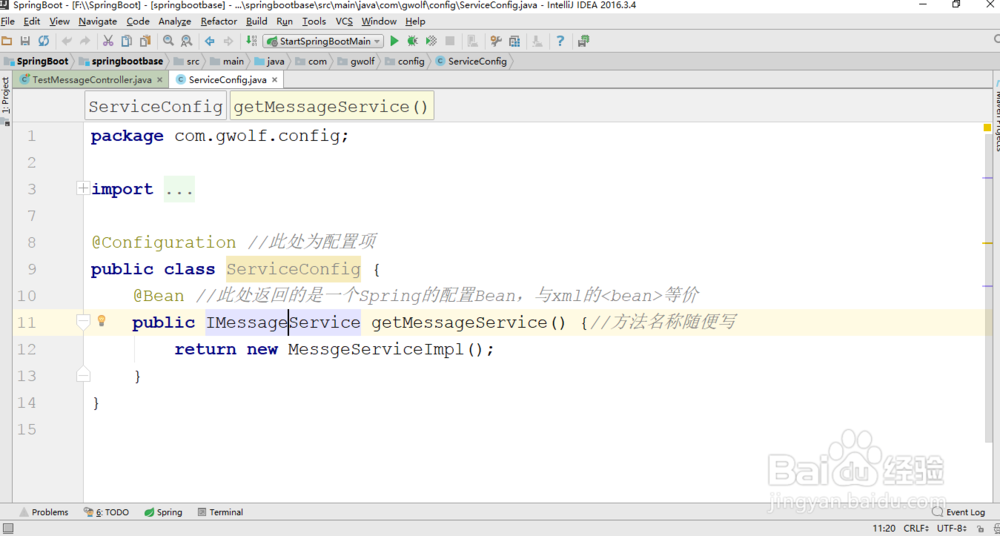
6、下面利用以上的程序来了解一下什么叫做Bean配置,为了清楚的发现Bean的特点删除掉业务实现子类中的“@Service”注解,也就是说这个对象现在无法直接注入,于是下面在启动类所在包的子包里面建立一个配置程序类:com.gwolf.config.ServiceConfig。
package com.gwolf.config;
import com.gwolf.service.IMessageService;
import com.gwolf.service.impl.MessgeServiceImpl;
import org.springframework.context.annotation.Bean;
import org.springframework.context.annotation.Configuration;
@Configuration //此处为配置项
public class ServiceConfig {
@Bean //此处返回的是一个Spring的配置Bean,与xml的<bean>等价
public IMessageService getMessageService() {//方法名称随便写
return new MessgeServiceImpl();
}
}
7、现在再次验证程序是否能够正常执行:
8、此时采用了自动扫描Bean的模式来进行相关对象的配置。SSM或SSH开发框架出现的时间比较长,现在迁移到SpringBoot之中,那么说如果你现在已经有一个非常完善的xml配置文件出现了,那么难道还需要将整个的xml配置文件转化为Bean配置吗?为了防止这类情况出现,SpringBoot也支持有配置文件的读取。这样就完成了SpringBoot中如何进行Bean配置。