SpringBoot部署:profile配置
1、在实际的开发之中,由于开发(dev)、测试(beta)、运行(product)的环境不同,有可能需要选择不同的配置文件。在SpringBoot里面充分的考虑到了此类问题,那么专门提供有多个profile配置,但是对于多profile配置一定要区分出是yml还是properties,这两种资源的配置是不同的。
1、基于yml实现profile的配置处理:
在使用yml配置文件的时候所有可以使用的profile配置项都要求在一个文件之中编写;
spring:
profiles:
active: dev
---
spring:
profiles: dev
messages:
basename: i18n/Message,i18n/Pages #资源文件的名称
server:
port: 8080
---
spring:
profiles: beta
messages:
basename: i18n/Message,i18n/Pages #资源文件的名称
server:
port: 9090
---
spring:
profiles: product
messages:
basename: i18n/Message,i18n/Pages #资源文件的名称
server:
port: 80

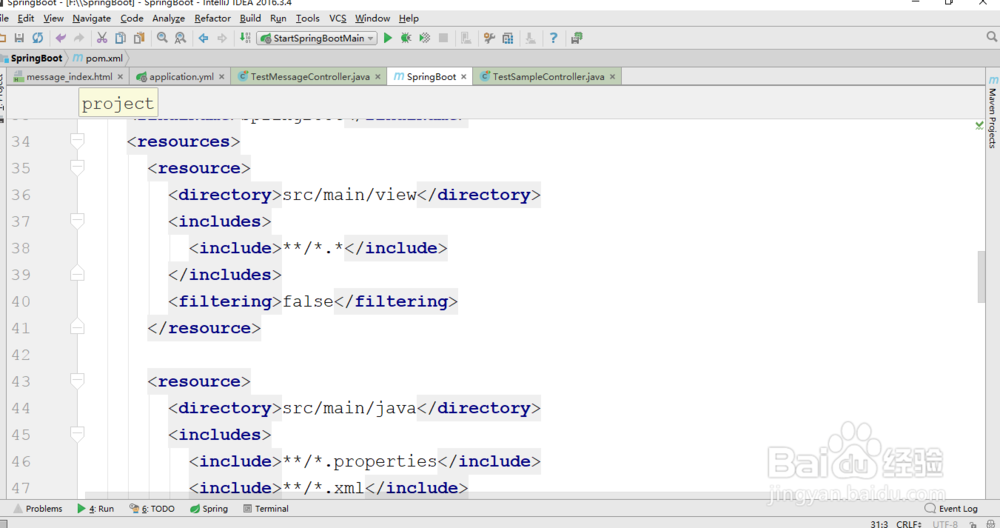
2、此时所有的thymeleaf页面都保存在"scr/main/view"目录之中,二期所有的SpringBoot配置文件(*.yml)这个文件也应该一起输出在jar文件里面,那么就需要配置到一个资源的引用,修改【SpringBoot】中的pom.xml配置文件:
<resources>
<resource>
<directory>src/main/view</directory>
<includes>
<include>**/*.*</include>
</includes>
<filtering>false</filtering>
</resource>
<resource>
<directory>src/main/java</directory>
<includes>
<include>**/*.properties</include>
<include>**/*.xml</include>
<include>**/*.tld</include>
</includes>
<filtering>false</filtering>
</resource>
<resource>
<directory>src/main/resources</directory>
<includes>
<include>**/*.properties</include>
<include>**/*.xml</include>
<include>**/*.tld</include>
<include>**/*.yml</include>
</includes>
</resource>
</resources>
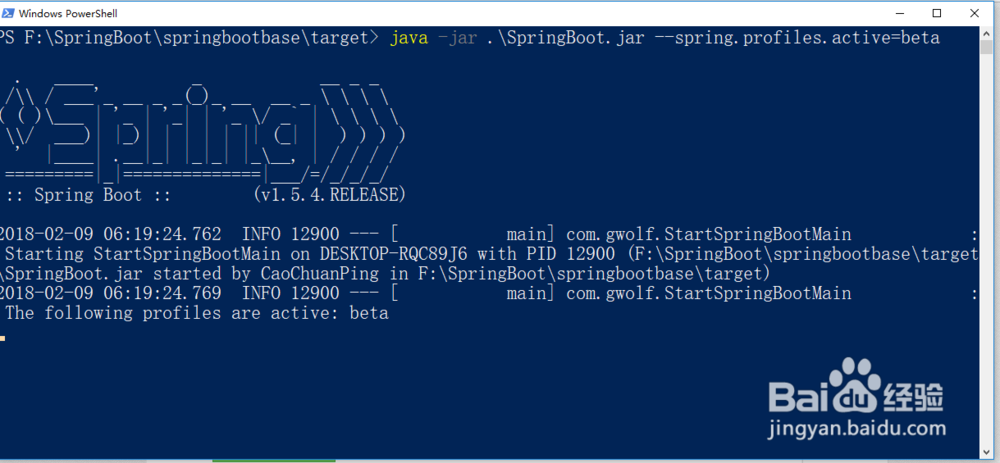
3、最初进行profile切换的处理可以通过maven的编译工具动态选择,但是在SpringBoot里面可以方便的实现这种切换。随后可以将项目进行打包处理,在打包之后也可以动态切换profile配置;
Maven打包:clean package;
打包完成之后就可以运行程序了:如果现在使用默认的profile就正常执行;
java -jar SpringBoot.jar

4、难道以后每一次访问都需要重新打包吗?也就是说为了方便用户的动态进行profile切换,可以在程序执行的时候设置一个执行的处理参数:
java -jar SpringBoot.jar --spring.profiles.active=beta
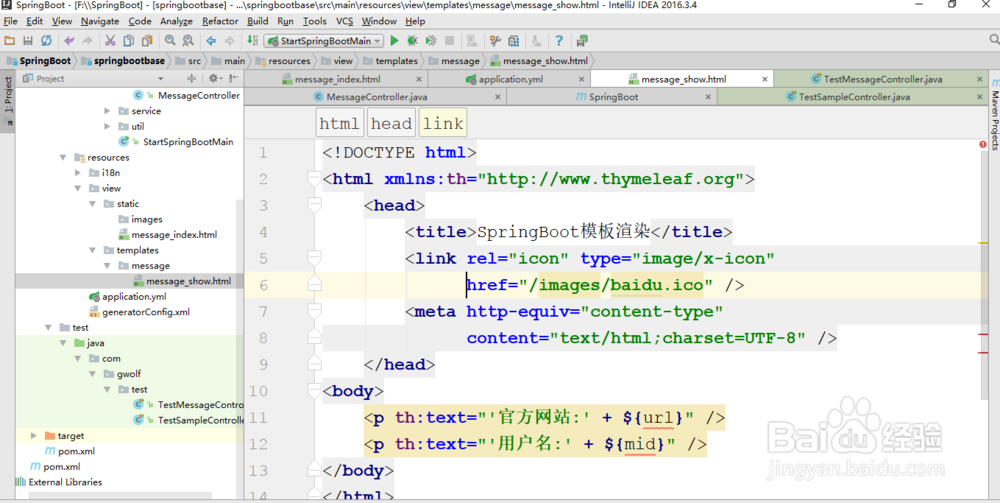
5、【趣味问题】现在当运行之后你会发现程序之中默认采用的图标是Spring的图标。但是很多的公司应该去更换自己的图标,所以这个时候可以单独准备出一个ico配置文件,可以将这个配置文件拷贝到“src/main/view/static/images”目录之中,随后在页面之中进行引入:
<!DOCTYPE html>
<html xmlns:th="http://www.thymeleaf.org">
<head>
<title>SpringBoot模板渲染</title>
<link rel="icon" type="image/x-icon" href="/images/baidu.ico" />
<meta http-equiv="content-type"
content="text/html;charset=UTF-8" />
</head>
<body>
<p th:text="'官方网站:' + ${url}" />
<p th:text="'用户名:' + ${mid}" />
</body>
</html>

6、在进行profile配置的时候特别需要注意一点,如果你使用的是application.properties配置,这样的配置处理过程是不一样的,也就是说如果你基于属性文件完成配置,那么就需要编写多个属性文件内容:
【开发】application-dev.properties
【测试】application-beta.properties
【线上】application-product.properties

7、随后还是需要有一个公共的application.properties配置文件出现,用于指派可以使用的profile配置。