Centos 安装SVN
1、环境检查
1.检查是否安装了低版本的SVN[root@localhost /]# rpm -qa subversion
2.卸载旧版本SVN[root@localhost modules]# yum remove subversion
2、安装svn
[root@localhost modules]# yum install httpd httpd-devel subversion mod_dav_svn mod_auth_mysql
确认已安装了svn模块
[root@localhost /]# cd /etc/httpd/modules[root@localhost modules]# ls | grep svnmod_authz_svn.somod_dav_svn.so
3、验证安装
检验已经安装的SVN版本信息 [root@localhost modules]# svnserve --version

4、代码库创建
SVN软件安装完成后还需要建立SVN库 [root@localhost modules]# mkdir -p /opt/svn/repositories[root@localhost modules]# svnadmin create /opt/svn/repositories执行上面的命令后,自动建立repositories库,查看/opt/svn/repositories 文件夹发现包含了conf, db,format,hooks, locks, README.txt等文件,说明一个SVN库已经建立。
5、配置代码库
进入上面生成的文件夹conf下,进行配置 [root@localhost modules]# cd /opt/svn/repositories/conf
6、用户密码passwd配置
[root@localhost password]# cd /opt/svn/repositories/conf[root@admin conf]# vi + passwd
[users]# harry = harryssecret# sally = sallyssecretzhoulf=123456
7、权限控制authz配置
[root@admin conf]# vi + authz目的是设置哪些用户可以访问哪些目录,向authz文件追加以下内容:
#设置[/]代表根目录下所有的资源 [/]zhoulf=rw
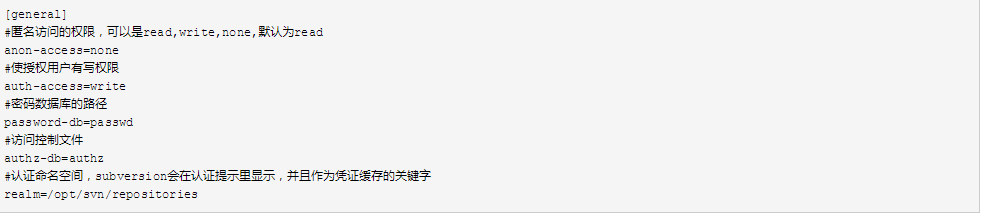
8、服务svnserve.conf配置
[root@admin conf]# vi + svnserve.conf
配置防火墙端口
[root@localhost conf]# vi /etc/sysconfig/iptables添加以下内容: -A INPUT -m state --state NEW -m tcp -p tcp --dport 3690 -j ACCEPT保存后重启防火墙 [root@localhost conf]# service iptables restart
9、启动SVN
svnserve -d -r /opt/svn/repositories
查看SVN进程
[root@localhost conf]# ps -ef|grep svn|grep -v greproot 12538 1 0 14:40 ? 00:00:00 svnserve -d -r /opt/svn/repositories
检测SVN 端口
[root@localhost conf]# netstat -ln |grep 3690tcp 0 0 0.0.0.0:3690 0.0.0.0:* LISTEN
停止重启SVN
[root@localhost password]# killall svnserve //停止 [root@localhost password]# svnserve -d -r /opt/svn/repositories // 启动