SpringMVC使用restful实现员工数据的新增
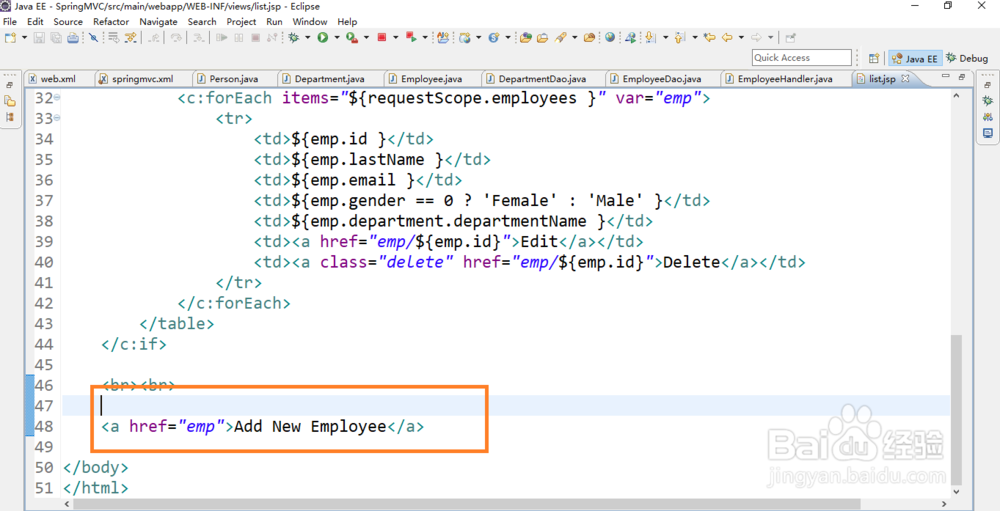
1、在list.jsp页面中增加一个新增链接:
<%@ page language="java" contentType="text/html; charset=UTF-8"
pageEncoding="UTF-8"%>
<%@ taglib prefix="c" uri="http://java.sun.com/jsp/jstl/core" %>
<!DOCTYPE html PUBLIC "-//W3C//DTD HTML 4.01 Transitional//EN" "http://www.w3.org/TR/html4/loose.dtd">
<html>
<head>
<meta http-equiv="Content-Type" content="text/html; charset=UTF-8">
<title>Insert title here</title>
</head>
<body>
<form action="" method="POST">
<input type="hidden" name="_method" value="DELETE"/>
</form>
<c:if test="${empty requestScope.employees }">
没有任何员工信息.
</c:if>
<c:if test="${!empty requestScope.employees }">
<table border="1" cellpadding="10" cellspacing="0">
<tr>
<th>ID</th>
<th>LastName</th>
<th>Email</th>
<th>Gender</th>
<th>Department</th>
<th>Edit</th>
<th>Delete</th>
</tr>
<c:forEach items="${requestScope.employees }" var="emp">
<tr>
<td>${emp.id }</td>
<td>${emp.lastName }</td>
<td>${emp.email }</td>
<td>${emp.gender == 0 ? 'Female' : 'Male' }</td>
<td>${emp.department.departmentName }</td>
<td><a href="emp/${emp.id}">Edit</a></td>
<td><a class="delete" href="emp/${emp.id}">Delete</a></td>
</tr>
</c:forEach>
</table>
</c:if>
<br><br>
<a href="emp">Add New Employee</a>
</body>
</html>
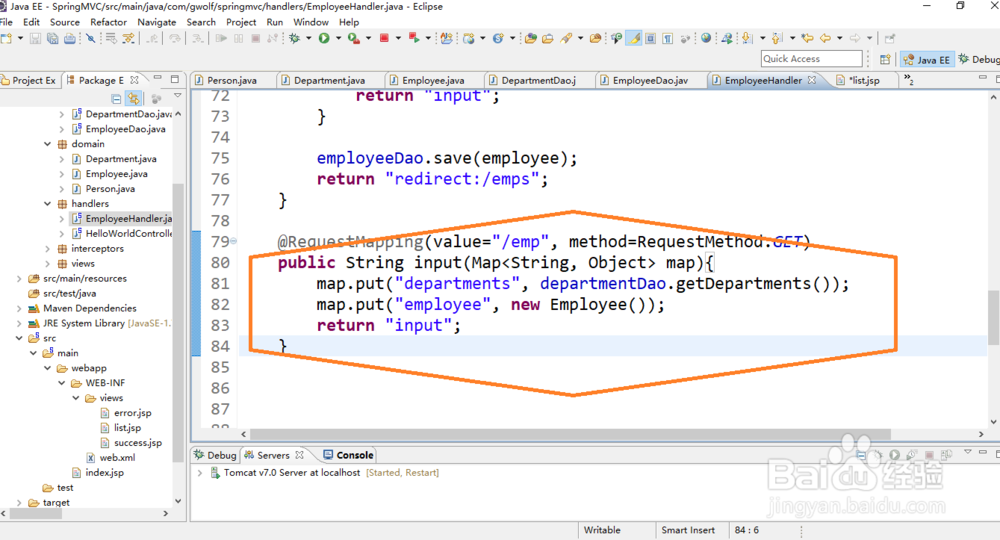
2、在控制层实现新增请求的跳转。
package com.gwolf.springmvc.handlers;
import java.util.Map;
import javax.validation.Valid;
import org.springframework.beans.factory.annotation.Autowired;
import org.springframework.stereotype.Controller;
import org.springframework.validation.Errors;
import org.springframework.validation.FieldError;
import org.springframework.web.bind.annotation.ModelAttribute;
import org.springframework.web.bind.annotation.PathVariable;
import org.springframework.web.bind.annotation.RequestMapping;
import org.springframework.web.bind.annotation.RequestMethod;
import org.springframework.web.bind.annotation.RequestParam;
import com.gwolf.springmvc.dao.DepartmentDao;
import com.gwolf.springmvc.dao.EmployeeDao;
import com.gwolf.springmvc.domain.Employee;
@Controller
public class EmployeeHandler {
@Autowired
private EmployeeDao employeeDao;
@Autowired
private DepartmentDao departmentDao;
@RequestMapping(value="/emp", method=RequestMethod.GET)
public String input(Map<String, Object> map){
map.put("departments", departmentDao.getDepartments());
map.put("employee", new Employee());
return "input";
}
@RequestMapping("/emps")
public String list(Map<String, Object> map){
map.put("employees", employeeDao.getAll());
return "list";
}
}
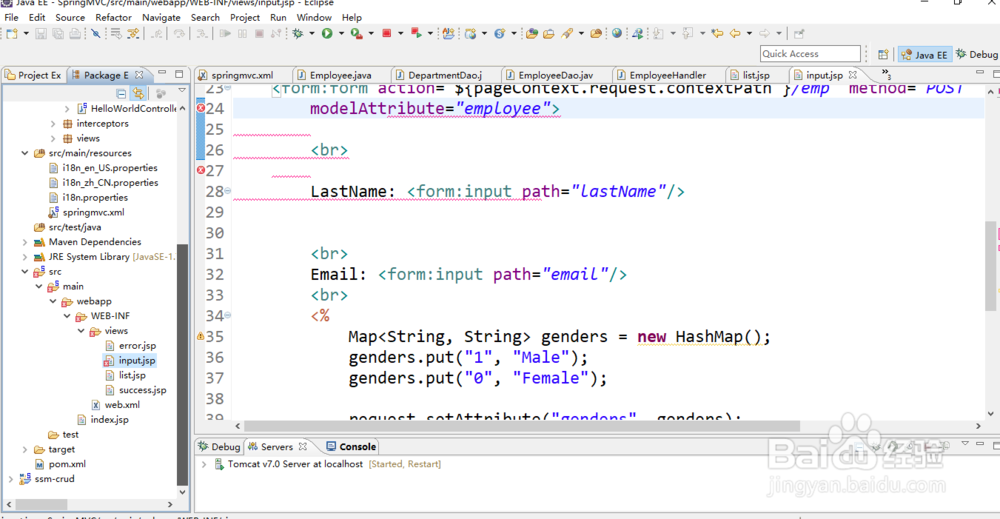
3、使用Spring的form标签实现表单数据,这样可以更快速的开发出表单页面, 而且可以更方便的进行表单值的回显;
<%@page import="java.util.HashMap"%>
<%@page import="java.util.Map"%>
<%@ page language="java" contentType="text/html; charset=UTF-8"
pageEncoding="UTF-8"%>
<%@ taglib prefix="form" uri="http://www.springframework.org/tags/form" %>
<%@ taglib prefix="c" uri="http://java.sun.com/jsp/jstl/core" %>
<!DOCTYPE html PUBLIC "-//W3C//DTD HTML 4.01 Transitional//EN" "http://www.w3.org/TR/html4/loose.dtd">
<html>
<head>
<meta http-equiv="Content-Type" content="text/html; charset=UTF-8">
<title>Insert title here</title>
</head>
<body>
<!--
1. WHY 使用 form 标签呢 ?
可以更快速的开发出表单页面, 而且可以更方便的进行表单值的回显
2. 注意:
可以通过 modelAttribute 属性指定绑定的模型属性,
若没有指定该属性,则默认从 request 域对象中读取 command 的表单 bean
如果该属性值也不存在,则会发生错误。
-->
<form:form action="${pageContext.request.contextPath }/emp" method="POST"
modelAttribute="employee">
<br>
LastName: <form:input path="lastName"/>
<br>
Email: <form:input path="email"/>
<br>
<%
Map<String, String> genders = new HashMap();
genders.put("1", "Male");
genders.put("0", "Female");
request.setAttribute("genders", genders);
%>
Gender:
<br>
<form:radiobuttons path="gender" items="${genders }" delimiter="<br>"/>
<br>
Department: <form:select path="department.id"
items="${departments }" itemLabel="departmentName" itemValue="id"></form:select>
<br>
Birth: <form:input path="birth"/>
<br>
Salary: <form:input path="salary"/>
<br>
<input type="submit" value="Submit"/>
</form:form>
</body>
</html>
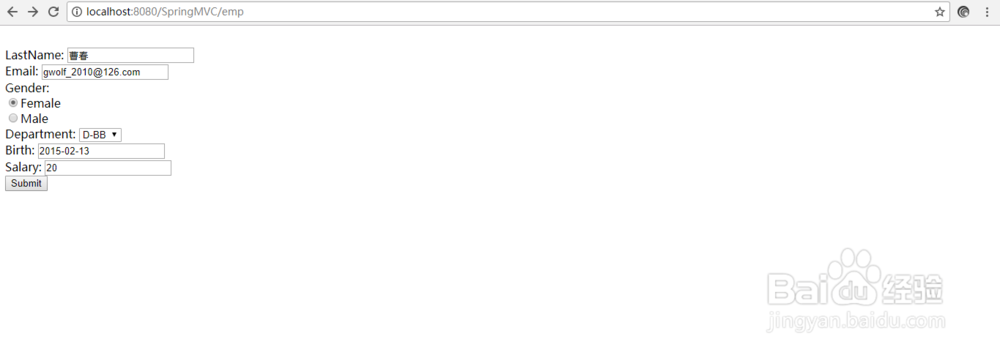
4、启动tomcat服务器,查看jsp页面的显示效果:

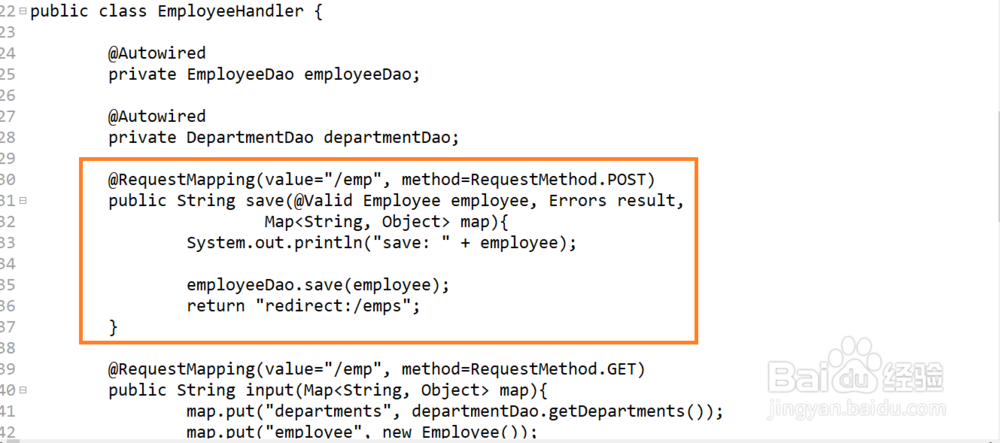
5、在springmvc中实现表单保存的方法实现。
package com.gwolf.springmvc.handlers;
import java.util.Map;
import javax.validation.Valid;
import org.springframework.beans.factory.annotation.Autowired;
import org.springframework.stereotype.Controller;
import org.springframework.validation.Errors;
import org.springframework.validation.FieldError;
import org.springframework.web.bind.annotation.ModelAttribute;
import org.springframework.web.bind.annotation.PathVariable;
import org.springframework.web.bind.annotation.RequestMapping;
import org.springframework.web.bind.annotation.RequestMethod;
import org.springframework.web.bind.annotation.RequestParam;
import com.gwolf.springmvc.dao.DepartmentDao;
import com.gwolf.springmvc.dao.EmployeeDao;
import com.gwolf.springmvc.domain.Employee;
@Controller
public class EmployeeHandler {
@Autowired
private EmployeeDao employeeDao;
@Autowired
private DepartmentDao departmentDao;
@RequestMapping(value="/emp", method=RequestMethod.POST)
public String save(@Valid Employee employee, Errors result,
Map<String, Object> map){
System.out.println("save: " + employee);
employeeDao.save(employee);
return "redirect:/emps";
}
@RequestMapping(value="/emp", method=RequestMethod.GET)
public String input(Map<String, Object> map){
map.put("departments", departmentDao.getDepartments());
map.put("employee", new Employee());
return "input";
}
@RequestMapping("/emps")
public String list(Map<String, Object> map){
map.put("employees", employeeDao.getAll());
return "list";
}
}
6、在jsp页面中提交表单,查看数据是否能够正常保存。
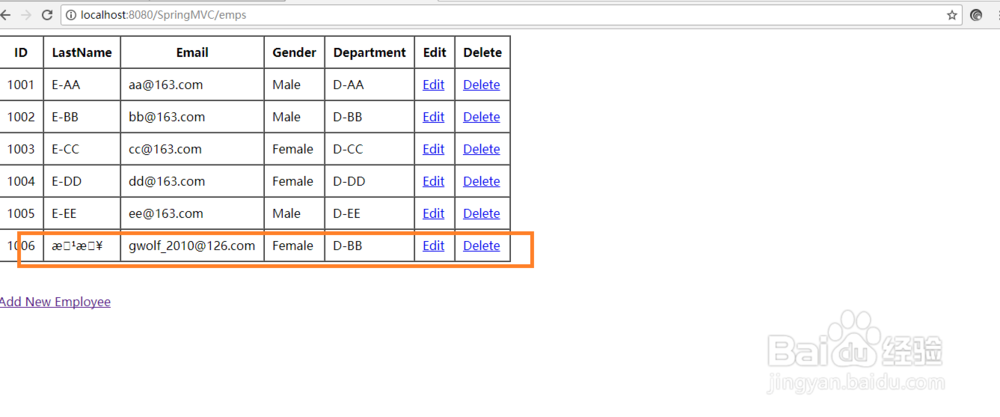
7、数据成功保存并且跳转到列表页面显示