spring mvc框架搭建详解
1、 下面我们在IntelliJ IDEA下新建一个Web应用项目作为演示搭建框架的准备。
打开新建项目对话框
在IntelliJ IDEA主界面顶部菜单栏依次“File”-"New"-"Project..."

2、在对话框中依次点击:
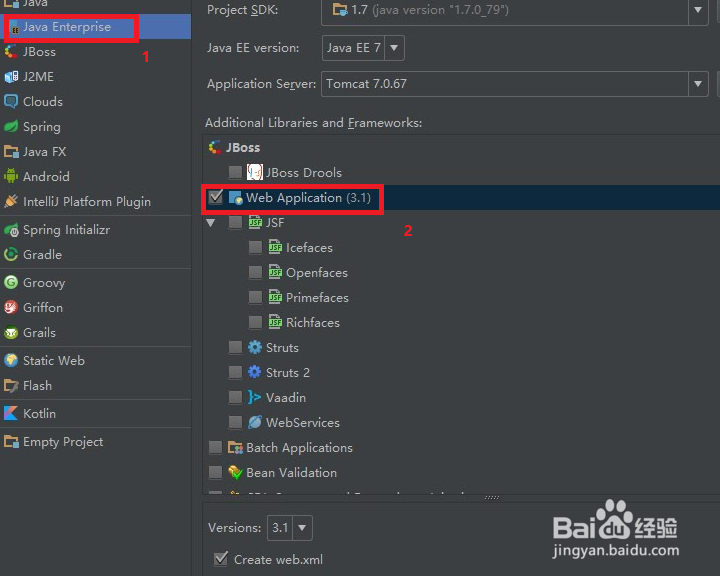
1)“Java Enterprise”选项卡
2)勾选“Web Application(3.1)”复选框,这是表示我们新建的项目是个网站。
其他选项默认。
3)“Next”按钮。

3、填写项目的名称即路径
1)“Project name”后的文本框填写项目名称。
2)“Project location”后的文本框填写项目路径。也可以点击“...”来打开选择路径的对话框。
3)点击“Finish”即完了项目的创建。

1、 在从文章开头提供的路径中下载解压包,解压后在“spring-framework-4.1.0.RELEASE\libs”路径下有“依赖包”和“只有功能”文件夹。
把这两个文件夹下的.jar文件分别复制。

2、 把上一步分别复制的.jar包粘贴在IntelliJ IDEA左侧“Project”面板“项目名/web/WEB-INF/lib”下。

3、 IntelliJ IDEA并不像eclipse可以自动导入特定文件夹下的包。下面我们继续导包:
在IntelliJ IDEA主界面顶部菜单栏依次“File”-"New"-"Project..."

4、在“Project Structure”对话框中依次选择:
1)左侧的“Modules”菜单
2)“Dependencies”选项卡
3)单击“+”号
4)单击“JAR or directories...”菜单项

5、1)在“Attach Files or Directories”对话框中的选择当前项目刚才粘贴.jar文件的“bin”文件夹。
2)点击“OK”按钮导包完成。

1、 由于Spring MVC只是Spring框架的一个功能,所以我们也要配置Spring框架需要的配置文档。
IntelliJ IDEA左侧“Project”面板“src”文件夹下新建一个.xml文件,文件名可自定义,此例中叫做“applicationContext.xml”

2、 把上面新建的“applicationContext.xml”文件里的所有代码清除,粘贴面的代码:
<?xml version="1.0" encoding="UTF-8"?>
<beans xmlns="http://www.springframework.org/schema/beans" xmlns:xsi="http://www.w3.org/2001/XMLSchema-instance" xsi:schemaLocation="
http://www.springframework.org/schema/beans http://www.springframework.org/schema/beans/spring-beans-4.0.xsd">
</beans>
当前我们没有添加任何Spring具体的配置信息,只是Spring必须纯在的代码。

3、 Spring MVC一大便利之处在于不像struts2那样需要为每个Action(控制器)添加一条配置,而只需要配置一个包,把所有Action放在这个包下。当用户请求一个链接,Spring MVC根据链接内容利用反射调用这个包下相关的Action。
IntelliJ IDEA左侧“Project”面板“src”文件夹下新建一个包,文件名可自定义,此例中叫做“helloworld_springmvc.controll”

4、 下面我们填写Spring MVC的配置文档。
IntelliJ IDEA左侧“Project”面板“web/WEB-INF”文件夹下新建一个.xml文件,文件名可自定义,此例中叫做“springmvc.xml”
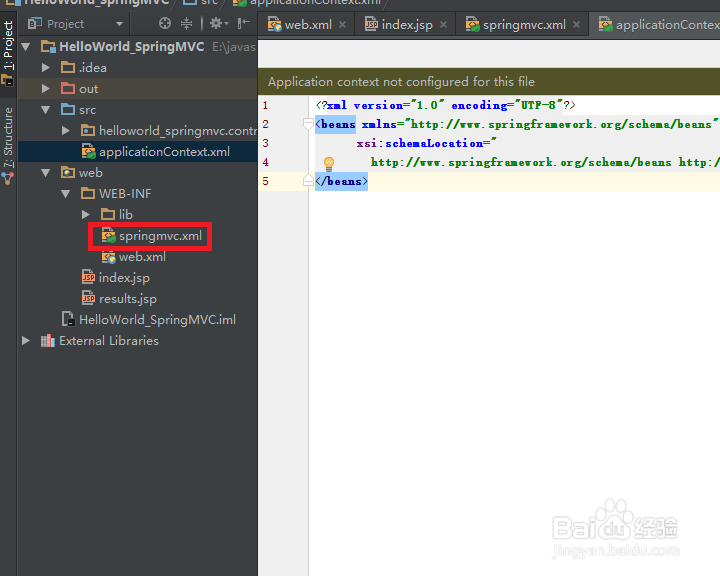
5、 把上面新建的“springmvc.xml”文件里的所有代码清除,粘贴面的代码:
<?xml version="1.0" encoding="UTF-8"?>
<beans xmlns="http://www.springframework.org/schema/beans"
xmlns:xsi="http://www.w3.org/2001/XMLSchema-instance"
xmlns:p="http://www.springframework.org/schema/p"
xmlns:context="http://www.springframework.org/schema/context"
xsi:schemaLocation="
http://www.springframework.org/schema/beans
http://www.springframework.org/schema/beans/spring-beans.xsd
http://www.springframework.org/schema/context
http://www.springframework.org/schema/context/spring-context-4.1.xsd">
<!---自动注入-->
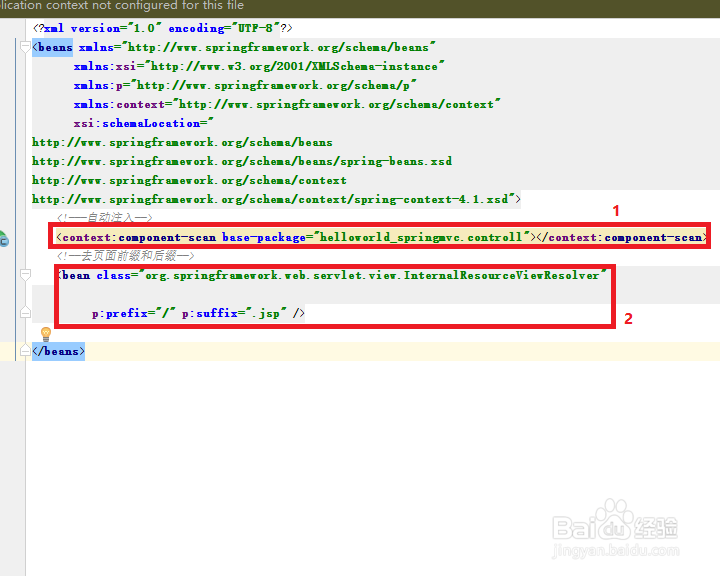
<context:component-scan base-package="helloworld_springmvc.controll"></context:component-scan>
<!--去页面前缀和后缀-->
<bean class="org.springframework.web.servlet.view.InternalResourceV
iewResolver"
p:prefix="/" p:suffix=".jsp" />
</beans>
1) base-package:值为控制器所在的包,也就是第3步我们新建的包。
2)
p:prefix:值为url路径与控制器所设路径匹配时忽略的前缀。
p:suffix:值为url路径与控制器所设路径匹配时忽略的后缀。
6、下面我们修改IntelliJ IDEA左侧“Project”面板“web/WEB-INF”文件夹的web.xml文件

7、下面我们在web.xml的<web-app>与</web-app>之间添加以下代码:
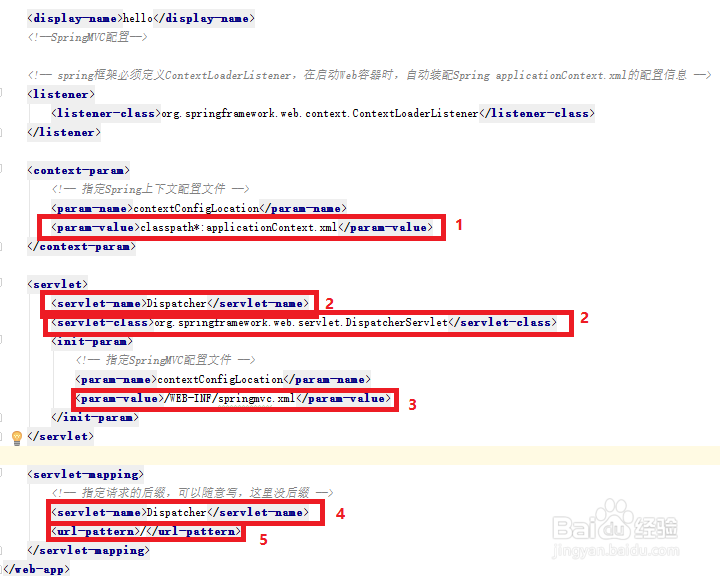
<!--SpringMVC配置-->
<!-- spring框架必须定义ContextLoaderListener,在启动Web容器时,自动装配Spring applicationContext.xml的配置信息 -->
<listener>
<listener-class>org.springframework.web.context.ContextLoaderListen
er</listener-class>
</listener>
<context-param> <!-- 指定Spring上下文配置文件 -->
<param-name>contextConfigLocation</param-name>
<param-value>classpath*:applicationContext.xml</param-value>
</context-param>
<servlet>
<servlet-name>Dispatcher</servlet-name>
<servlet-class>org.springframework.web.servlet.DispatcherServlet</se
rvlet-class>
<init-param>
<!-- 指定SpringMVC配置文件 -->
<param-name>contextConfigLocation</param-name>
<param-value>/WEB-INF/springmvc.xml</param-value>
</init-param>
</servlet>
<servlet-mapping>
<!-- 指定请求的后缀,可以随意写,这里没后缀 -->
<servlet-name>Dispatcher</servlet-name>
<url-pattern>/</url-pattern>
</servlet-mapping>
1)“applicationContext.xml"为Spring框架需要的配置文件,我们1、2步做的。
"classpath"后面加‘*’表示现在项目中寻找该文件,如果没找到则在项目包含的jar包中找。未加'*'则表示只在项目中寻找该文件。
2)注意Spring MVC在web.xml里只要配置一个Servlet即可。Servlet名可自定义,此例中叫做“Dispatcher”
3)此处值为第4、5步配置的"springmvc.xml"文档。
4)刚才Spring MVC Servlet的url路径映射,"servlet-name"值需与Spring MVC Serlet"servlet-name"值一致。
5)表示用户在发送什么url请求时调用该Servlet,“/”表示在此域所有请求都会调用该Servlet。
8、这样Spring MVC配置完成。
