zbar如何使用
1、1.使用ZBar项目。下载地址是
2.新建一个项目。
3.导入 ZBar的sdk。把ZBar SDK的目录拉入项目,然后选中copy选项
导入ZBarSDK文件并引入一下框架
AVFoundation.framework(weak)CoreMedia.framework (weak)CoreVideo.framework (weak)QuartzCore.frameworklibiconv.dylib
最后,引入头文件#import “ZBarSDK.h” 即可使用。

2、4.在项目文件的target中加入 以下framework
5.在appDelegate文件中加入 标记部分的代码
- (BOOL)application:(UIApplication *)application didFinishLaunchingWithOptions:(NSDictionary *)launchOptions
{
self.window = [[[UIWindow alloc] initWithFrame:[[UIScreen mainScreen] bounds]] autorelease];
// Override point for customization after application launch.
self.viewController = [[[ViewController alloc] initWithNibName:@"ViewController" bundle:nil] autorelease];
self.window.rootViewController = self.viewController;
[self.window makeKeyAndVisible];
// force view class to load so it may be referenced directly from NIB
[ZBarReaderView class];
return YES;
}

3、注意此代码:
// force view class to load so it may be referenced directly from NIB
[ZBarReaderView class];
6.在.h文件中加入 ZBarReaderViewDelegate的实现。

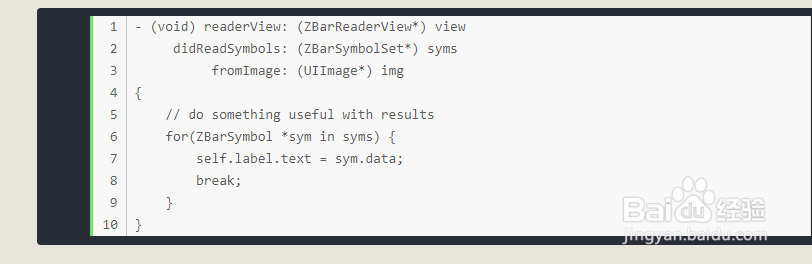
4、7.在.m文件中要实现的主要方法是:
- (void) readerView: (ZBarReaderView*) view
didReadSymbols: (ZBarSymbolSet*) syms
fromImage: (UIImage*) img
{
// do something useful with results
for(ZBarSymbol *sym in syms) {
self.label.text = sym.data;
break;
}
}
这里是功能是读取照片信息,把条码放如label显示
-(void) viewDidAppear:(BOOL)animated
{
// run the reader when the view is visible
[readerView start];
}

5、这个是在显示视图的时候,启动摄像头,开始扫描
- (void)viewDidLoad
{
[super viewDidLoad];
// Do any additional setup after loading the view, typically from a nib.
// the delegate receives decode results
readerView.readerDelegate = self;
// you can use this to support the simulator
if(TARGET_IPHONE_SIMULATOR) {
cameraSim = [[ZBarCameraSimulator alloc]
initWithViewController: self];
cameraSim.readerView = readerView;
}
}
在初始化的时候,设置托管。