android 纯c/c++开发
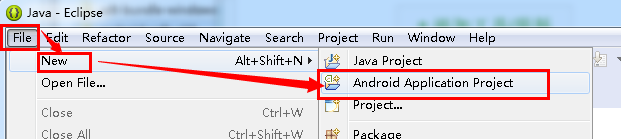
1、打开eclipse;
2、打开菜单->File->New->Android Application;
3、设置工程名,sdk版本,注意:主题设置为 None,点击next;

4、Configure Project 是取消 Create activity 的复选框,点击next;

5、Configure the attributes of the icon set, 直接点击 next;

6、Select whether to create an activity, and if so, what kind of activity. 点击 finish即可;

7、工程便创建出来了

1、右键工程NativeTest->弹出菜单->Android Tools->Add Native Support...

2、Settings for generated native components for project.界面 直接点击Finish


3、将 android.mk 的内容补充完整:
LOCAL_PATH := $(call my-dir)
include $(CLEAR_VARS)
LOCAL_MODULE := NativeTest
LOCAL_SRC_FILES := NativeTest.cpp
LOCAL_LDLIBS := -llog -landroid
LOCAL_STATIC_LIBRARIES := android_native_app_glue
include $(BUILD_SHARED_LIBRARY)
$(call import-module,android/native_app_glue)

4、增加一个 Application.mk 文件(这一步可选),并写入:
APP_ABI := x86
APP_CPPFLAGS := --std=c++11
NDK_TOOLCHAIN_VERSION := 4.8

1、android_main:这个函数类似于win32开发的WinMain函数
2、app->onAppCmd = onAppCmd;
app->onInputEvent = onInputEvent;
类似于win32中设置窗口的回掉函数
3、 while ((ident=ALooper_pollAll(-1, NULL, &events,
(void**)&source)) >= 0) {
// Process this event.
if (source != NULL) {
source->process(app, source);
}
// Check if we are exiting.
if (app->destroyRequested != 0) {
return;
}
}
这一段类似于win32的消息循环
4、为了方便大家粘贴,android_main 函数的代码如下:
void android_main(struct android_app* app) {
// Make sure glue isn't stripped.
app_dummy();
app->onAppCmd = onAppCmd;
app->onInputEvent = onInputEvent;
while (1) {
int ident;
int events;
struct android_poll_source* source;
while ((ident=ALooper_pollAll(-1, NULL, &events,
(void**)&source)) >= 0) {
// Process this event.
if (source != NULL) {
source->process(app, source);
}
// Check if we are exiting.
if (app->destroyRequested != 0) {
return;
}
}
}
}

2、onAppCmd 描述的是真个activity的生命周期,类似于win32开发的消息处理回掉函数:
static void onAppCmd(struct android_app* app, int32_t cmd) {
switch (cmd) {
case APP_CMD_SAVE_STATE:
// The system has asked us to save our current state. Do so.
__android_log_print(ANDROID_LOG_DEBUG, "fuke", "engine_handle_cmd APP_CMD_SAVE_STATE");
break;
case APP_CMD_INIT_WINDOW:
// The window is being shown, get it ready.
__android_log_print(ANDROID_LOG_DEBUG, "fuke", "engine_handle_cmd APP_CMD_INIT_WINDOW");
break;
case APP_CMD_TERM_WINDOW:
__android_log_print(ANDROID_LOG_DEBUG, "fuke", "engine_handle_cmd APP_CMD_TERM_WINDOW");
break;
case APP_CMD_GAINED_FOCUS:
// When our app gains focus, we start monitoring the accelerometer.
__android_log_print(ANDROID_LOG_DEBUG, "fuke", "engine_handle_cmd APP_CMD_GAINED_FOCUS");
break;
case APP_CMD_LOST_FOCUS:
// When our app loses focus, we stop monitoring the accelerometer.
// This is to avoid consuming battery while not being used.
__android_log_print(ANDROID_LOG_DEBUG, "fuke", "engine_handle_cmd APP_CMD_LOST_FOCUS");
break;
}
}

3、onInputEvent 主要是用来触屏相关事件,也类似于win32开发的消息处理回掉函数,函数有两部分组成:
1、检测多点触屏,并通过logcat打印出多点触屏的信息;
2、控制屏幕颜色变化,每次松开手时颜色变化
3、为方便大家粘贴,onInputEvent函数的代码记录如下:
static int32_t onInputEvent(struct android_app* app, AInputEvent* event) {
if (AInputEvent_getType(event) == AINPUT_EVENT_TYPE_MOTION) {
int nNum = AMotionEvent_getPointerCount(event);
char szTrace[1024] = {0};
sprintf (szTrace, "engine_handle_input num=[%d]", nNum);
for (int nIdx = 0; nIdx < nNum; nIdx++)
{
int nX = AMotionEvent_getX(event, 0);
int nY = AMotionEvent_getY(event, 0);
sprintf (strrchr(szTrace, 0), " (%d %d)", nX, nY);
}
__android_log_print(ANDROID_LOG_DEBUG, "colorspace",
"%s", szTrace);
if (AKeyEvent_getAction(event) != AKEY_EVENT_ACTION_UP)
return 1;
ANativeWindow_BuffernativeWindow = {0};
int nRet = ANativeWindow_lock(app->pendingWindow, &nativeWindow, NULL);
int nArea = nativeWindow.width * nativeWindow.height;
unsigned long*pdwScreen = (unsigned long*)nativeWindow.bits;
static int s_nClr = 0;
unsigned long pdwClr[] = {
0x00000000, 0x000000ff, 0x0000ffff, 0x0000ff00,
0x00ffff00, 0x00ff0000, 0x00ff00ff, 0x00ffffff};
s_nClr ++;
if (s_nClr > sizeof(pdwClr) / sizeof(unsigned long))
s_nClr = 0;
for (int nIdx = 0; nIdx < nArea; nIdx++)
{
pdwScreen[nIdx] = pdwClr[s_nClr];
}
ANativeWindow_unlockAndPost(app->pendingWindow);
return 1;
}
return 0;
}


1、打开 AndroidManifest.xml
2、打开 Application 分页
3、增加一个 Activity
如下所示:

2、选择右边的 Browse;
2、取消 "Display classes from sources of ..." 前面的复选框;
3、在搜索栏输入"na",选中列出来的 "NativeActivity"
4、点击OK
效果如下:


3、选中 android.app.nativeActivity
2、点击 add
3、选择 Meta Data
4、点击Ok

4、输入:
android:name="android.app.lib_name"
android:value="NativeTest"

5、选中 android.app.nativeActivity
2、点击 add
3、选择 Intent Filter
4、点击Ok

6、选中 Intent Filter
2、点击 add
3、选择 Action
4、点击Ok
5、设置 android:name="android.intent.action.MAIN"


7、选中 Intent Filter
2、点击 add
3、选择 Category
4、点击Ok
5、设置 android:name="android.intent.category.LAUNCHER"


1、启动模拟器,运行效果如下:

2、点击后效果:


3、这次整个程序完成
1、整个程序实现:
1、android 下面的纯c/c++ 开发
2、实现了多点触屏的功能
3、实现了点击屏幕颜色的切换功能
2、 方便他人亦是方便自己,如果觉得还行就点下下边的投票吧,这样可以帮助其他人更快的找到解决问题的方法;有疑问的也可留言哦, 谢谢!