KVS Keepalived DR环境配置方法(一)
1、web3和web4都要操作
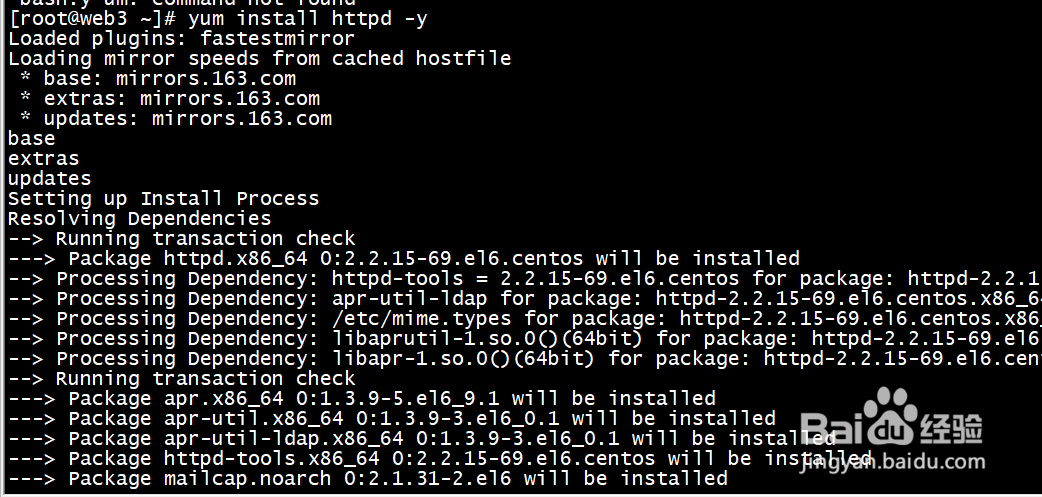
准备RS的web服务,web3/web4安装httpd
yum install httpd -y
2、web3和web4都要操作
[root@web3 ~]# service start httpd
start: unrecognized service
[root@web3 ~]# service httpd start
Starting httpd: httpd: apr_sockaddr_info_get() failed for web3
httpd: Could not reliably determine the server's fully qualified domain name, using 127.0.0.1 for ServerName
[ OK ]
[root@web3 ~]# chkconfig httpd on
[root@web3 ~]# chkconfig --list|grep httpd
httpd 0:off 1:off 2:on 3:on 4:on 5:on 6:off
[root@web3 ~]#

3、访问测试
[root@web4 ~]# curl 192.168.122.53
welcome to web3
You have new mail in /var/spool/mail/root
[root@web4 ~]# curl 192.168.122.54
welcome to web4
[root@web4 ~]#

4、web3和web4都要操作,开启arp抑制
[root@web3 ~]# cat arp.sh
#!/bin/bash
case $1 in
start)
echo 1 >/proc/sys/net/ipv4/conf/all/arp_ignore
echo 1 >/proc/sys/net/ipv4/conf/lo/arp_ignore
echo 2 >/proc/sys/net/ipv4/conf/all/arp_announce
echo 2 >/proc/sys/net/ipv4/conf/lo/arp_announce
;;
stop)
echo 0 >/proc/sys/net/ipv4/conf/all/arp_ignore
echo 0 >/proc/sys/net/ipv4/conf/lo/arp_ignore
echo 0 >/proc/sys/net/ipv4/conf/all/arp_announce
echo 0 >/proc/sys/net/ipv4/conf/lo/arp_announce
;;
esac
[root@web3 ~]#
[root@web3 ~]# chmod +x arp.sh
[root@web3 ~]# ./arp.sh
5、RS配置VIP接口,web3/web4 同时配置
[root@web3 ~]# ifconfig lo:0 192.168.122.200 netmask 255.255.255.255 broadcast 192.168.122.200 up
You have new mail in /var/spool/mail/root
[root@web3 ~]# route add -host 192.168.122.200 dev lo:0
[root@web3 ~]# route -n
Kernel IP routing table
Destination Gateway Genmask Flags Metric Ref Use Iface
192.168.122.200 0.0.0.0 255.255.255.255 UH 0 0 0 lo
192.168.122.0 0.0.0.0 255.255.255.0 U 0 0 0 eth0
169.254.0.0 0.0.0.0 255.255.0.0 U 1002 0 0 eth0
0.0.0.0 192.168.122.1 0.0.0.0 UG 0 0 0 eth0

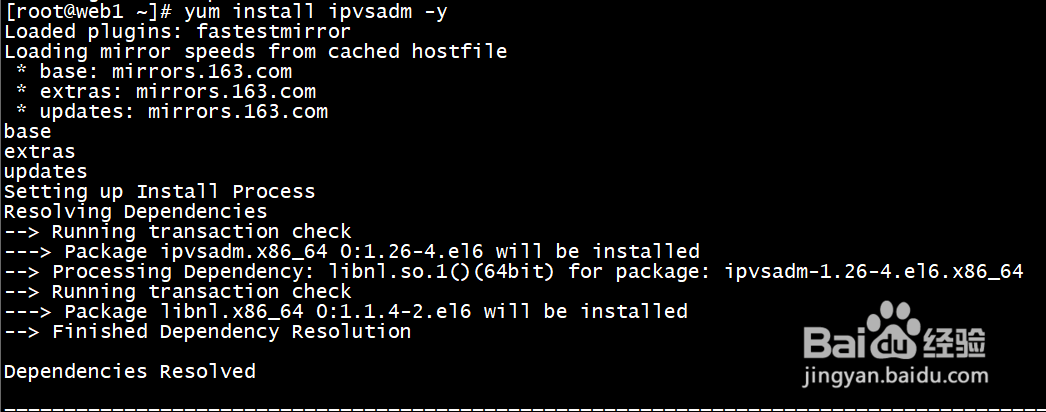
6、准备director的ipvsadm web1/web2上操作
yum install ipvsadm -y
7、web1/web2上操作
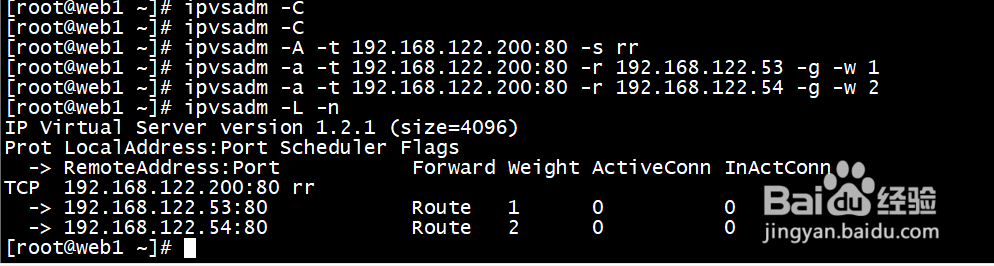
[root@web1 ~]# ipvsadm -C
[root@web1 ~]# ipvsadm -A -t 192.168.122.200:80 -s rr
[root@web1 ~]# ipvsadm -a -t 192.168.122.200:80 -r 192.168.122.53 -g -w 1
[root@web1 ~]# ipvsadm -a -t 192.168.122.200:80 -r 192.168.122.54 -g -w 2
[root@web1 ~]# ipvsadm -L -n
IP Virtual Server version 1.2.1 (size=4096)
Prot LocalAddress:Port Scheduler Flags
-> RemoteAddress:Port Forward Weight ActiveConn InActConn
TCP 192.168.122.200:80 rr
-> 192.168.122.53:80 Route 1 0 0
-> 192.168.122.54:80 Route 2 0 0
[root@web1 ~]#