如何搭建struts2项目
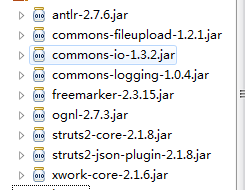
1、从网上下载struts2需要的jar包,以下是需要用到的jar包
2、1.在myeclipse中新建web工程,随便起名字,例如我的是叫logintest

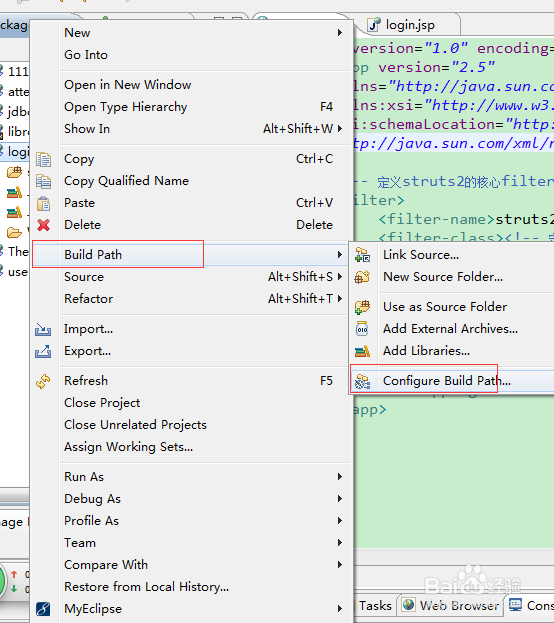
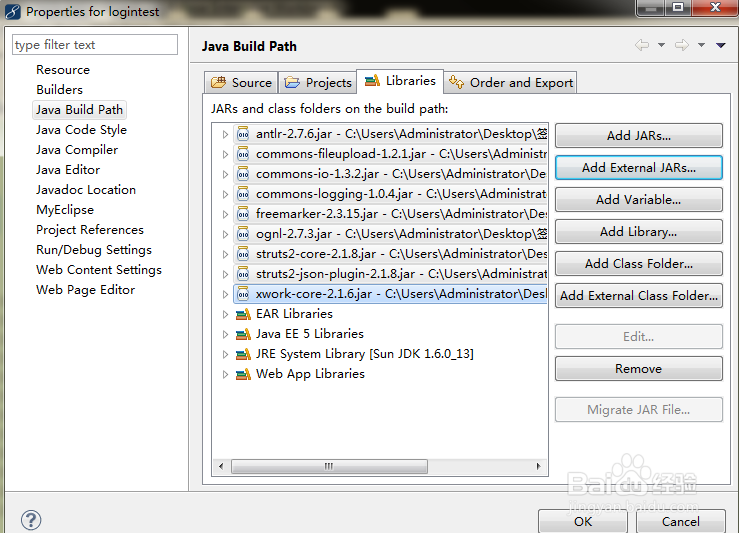
3、2.导入需要引用的jar包,在logintest项目上右键->build path->configure bulid path,点击libraries,点击add external jars...,选择你的struts2需要用到的jar包的位置添加进来,点击ok

4、3.在WebRoot下找到web.xml文件进行配置,将下面的代码粘贴过去
<?xml version="1.0" encoding="UTF-8"?>
<web-app version="2.5"
xmlns="http://java.sun.com/xml/ns/javaee"
xmlns:xsi="http://www.w3.org/2001/XMLSchema-instance"
xsi:schemaLocation="http://java.sun.com/xml/ns/javaee
http://java.sun.com/xml/ns/javaee/web-app_2_5.xsd">
<!-- 定义struts2的核心filter即struts2的FilterDispatcher的filter -->
<filter>
<filter-name>struts2</filter-name><!-- 定义核心filter的名称 -->
<filter-class><!-- 定义核心filter的实现类 -->
org.apache.struts2.dispatcher.FilterDispatcher
</filter-class>
</filter>
<!-- 核心filter拦截所有请求 即FilterDispatcher用来初始化struts2并且处理所有的web请求-->
<filter-mapping>
<filter-name>struts2</filter-name>
<url-pattern>/*</url-pattern>
</filter-mapping>
</web-app>
5、在src里面新建一个xml文件命名为struts.xml,然后将下面的代码粘贴到此文件中
<?xml version="1.0" encoding="UTF-8"?>
<!DOCTYPE struts PUBLIC
"-//Apache Software Foundation//DTD Struts Configuration 2.0//EN"
"http://struts.apache.org/dtds/struts-2.0.dtd">
<struts>
<!-- 若package加上namespace属性,则jsp页面form 的action属性必需加上项目名称的路径-->
<package name="struts2" extends="struts-default" namespace="/demo">
<action name="login" class="com.action.LoginAction" >
<result>/loginsuccess.jsp</result>
</action>
</package>
</struts>
6、在src中新建一个包,命名为com.action,在此包下新建一个类命名为LoginAction,将下面的代码站提过去
package com.action;
import com.opensymphony.xwork2.ActionSupport;
public class LoginAction extends ActionSupport{
private String username;
private String password;
public String getUsername() {
return username;
}
public void setUsername(String username) {
this.username = username;
}
public String getPassword() {
return password;
}
public void setPassword(String password) {
this.password = password;
}
public String execute(){
System.out.println("走进action");
return SUCCESS;
}
public String login(){
return SUCCESS;
}
}
7、在WebRoot下新建一个jsp,命名为login.jsp,将下面的代码复制过去
<%@ page language="java" import="java.util.*" pageEncoding="UTF-8"%>
<%
String path = request.getContextPath();
String basePath = request.getScheme()+"://"+request.getServerName()+":"+request.getServerPort()+path+"/";
%>
<!DOCTYPE HTML PUBLIC "-//W3C//DTD HTML 4.01 Transitional//EN">
<html>
<head>
<base href="<%=basePath%>">
<title>My JSP 'login.jsp' starting page</title>
<meta http-equiv="pragma" content="no-cache">
<meta http-equiv="cache-control" content="no-cache">
<meta http-equiv="expires" content="0">
<meta http-equiv="keywords" content="keyword1,keyword2,keyword3">
<meta http-equiv="description" content="This is my page">
<!--
<link rel="stylesheet" type="text/css" href="styles.css">
-->
</head>
<body>
<form action="/attendance_book/demo/login.action" method="post">
账号:<input type="text" name="username"/><br/>
密码:<input type="text" name="password"/><br/>
<input type="submit" value="确定">
</form>
</body>
</html>
8、在WebRoot下新建一个jsp,命名为loginsuccess.jsp,将下面的代码复制过去
<%@ page language="java" import="java.util.*" pageEncoding="UTF-8"%>
<%
String path = request.getContextPath();
String basePath = request.getScheme()+"://"+request.getServerName()+":"+request.getServerPort()+path+"/";
%>
<!DOCTYPE HTML PUBLIC "-//W3C//DTD HTML 4.01 Transitional//EN">
<html>
<head>
<base href="<%=basePath%>">
<title>My JSP 'loginsuccess.jsp' starting page</title>
<meta http-equiv="pragma" content="no-cache">
<meta http-equiv="cache-control" content="no-cache">
<meta http-equiv="expires" content="0">
<meta http-equiv="keywords" content="keyword1,keyword2,keyword3">
<meta http-equiv="description" content="This is my page">
<!--
<link rel="stylesheet" type="text/css" href="styles.css">
-->
</head>
<body>
用户名:${request.username}
密 码:${requestScope.password}
</body>
</html>
9、将此项目添加到tomcat中,启动tomcat,在地址栏输入地址:http://127.0.0.1:8080/logintest/login.jsp,
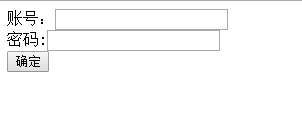
10、在此文本框中输入用户名和密码,会跳到下面的页面
